Category Archives: Operating Systems

Setting up HiveOS on ESXi 6.7 guest using GPU passthrough

This guide is to give a quick overview on how to setup HiveOS on ESXi 6.7 using PCI passthrough to setup a GPU. This guide assumes that you have an ESXi 6.7 (or higher) setup working. In this case I have the limitation of using vmklinux driver to power up my AMD Ryzen setup, so I cannot upgrade to ESXi 7 without acquiring a new NIC.

Also, this test was done only with a ZOTAC RTX 3070 but all the cards should work exactly the same way. Not sure about PCI passthrough limitations on VMware but in this case it’s only one GPU, so YMMV. I’m using the free version.

This guide is specific to the deployment of HiveOS, however this can be leveraged for other workloads that you might want to virtualize such as Tensorflow. This won’t cover GPU performance tuning, underclocking, etc. as I don’t have the proper experience with HiveOS and mining. No performance should be lost using DirectPath I/O but I’m unsure if this actually true as I didn’t test this device on a non virtualized environment (yet!). However, seems like common consensus about this card is around the same output as the one I’m getting (61.90 MH/s).

Step 1:  Download HiveOS
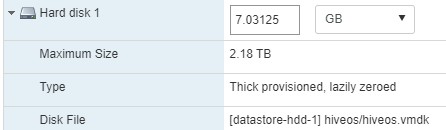
Once you download it the format will be on an .img file and you’ll need to convert it to VMDK. I used Starwind V2V converter for this task.

After converting it I had an issue after I tried to attach it to a VM, so I had to clone the disk inside of ESXi to make it work. (I also tried to upload it from VMware Workstation without success).

For doing this, upload the .vmdk file to your datastore and enable SSH on your ESXi host.

Syntax:

vmkfstools -i /vmfs/volumes/datastore/filename.vmdk /vmfs/volumes/datastore/newfilename.vmdk

Example:

[root@homelab:~] vmkfstools -i /vmfs/volumes/datastore-hdd-1/hiveos1/[email protected] /vmfs/volumes
/datastore-hdd-1/hiveos/hiveos.vmdk

Once this is completed after few minutes depending on your SSD/HDD, the clone will finish and you should be able to assign this drive to a VM HD.

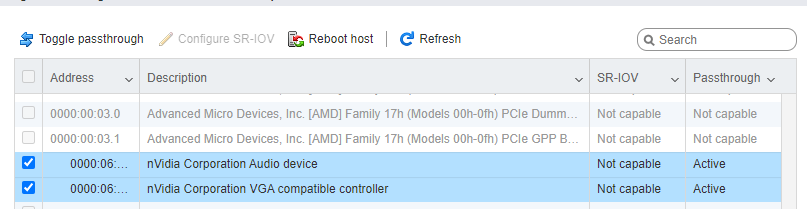
Step 2: Setup your PCI device as passthrough
Make sure that your passthrough status looks as active. If its inactive, click on the upper button “Toggle passthrough”.

This step requires a reboot of the ESXi host.

Step 3: Customize your VM

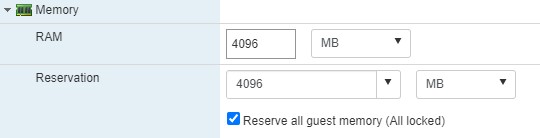
First, expand memory and check the Reserve all guest memory (all locked) option.

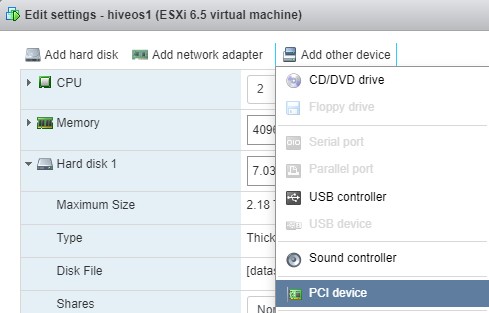
Assign the PCI devices to the VM. Not sure if the sound is required (best guess is not) but I added it anyway.

Click on Add other device -> PCI device a couple of times and then assign both devices that come from your NVIDIA GPU.

After this, go to VM options -> Advanced -> Edit configuration and make sure this settings are in place (or set them if not).

svga.guestBackedPrimaryAware = TRUE
svga.present = TRUE
hypervisor.cpuid.v0 = "FALSE"

Please note that if any of this settings is not in place (specially the last one), the VM won’t be able to utilize the CUDA cores as it will complain about “invalid device ordinal”.

Step 4: Setup HiveOS

You should be all set to boot  your VM and do a regular HiveOS install. You need to go to HiveOS website and create a worker, you’ll acquire a worker ID and password which you need to setup on your VM.

After that you need to create a “Flight Sheet” if you don’t have one already. Personally I used PhoenixMiner as Ethminer pool wasn’t working at the time I wrote this guide.

This should be how it looks like after:

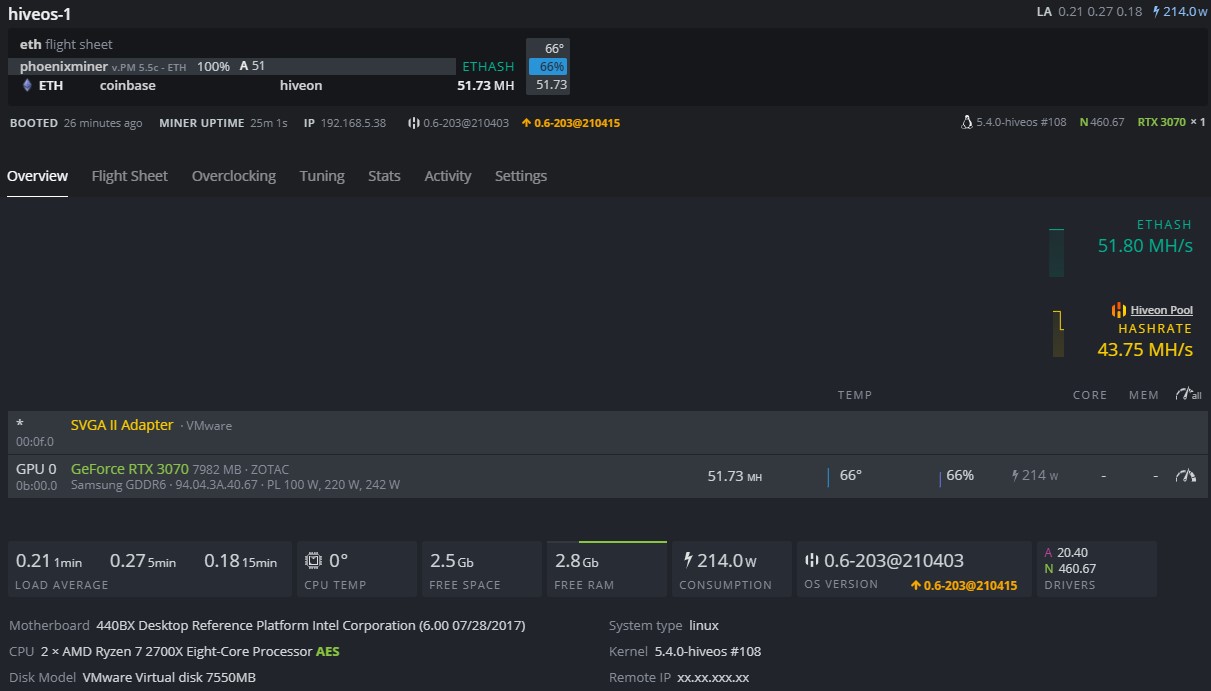
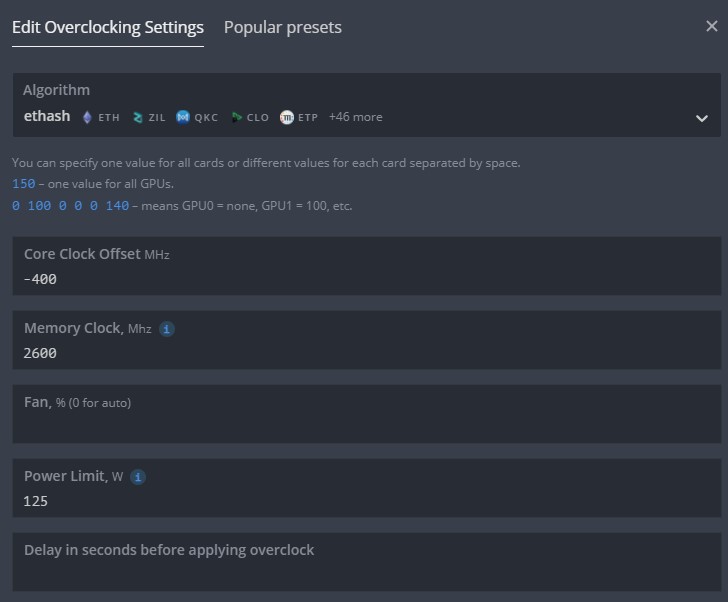
Now you can overclock as you like, without any modification it was doing 51 MH/s (having a 214w consumption) in average, after a little bit of tweaking and trying to be more efficient, I was able to get an average of 61.90 MH/s (125w consumption). But with this YMMV.

As always, feel free to reach out in case you have any question regarding this setup and I’ll try to answer.

Convert to RHEL from CentOS using Convert2RHEL

Hi everyone – It’s been a while since my last post and basically my situation is the following ben using CentOS 7 for a while at home and at some point on 2020 I did upgrade to CentOS 8 which probably I should have done a post about it is a more complex activity but well, I didn’t (yet).

Given the recent news of CentOS not following their standard cadence and moving away from what enterprise Linux is to CentOS Stream, you might want to move some workloads from CentOS to something with long-term support.

As you might know if you’re here, that includes Oracle Linux and the upcoming Rocky Linux (which first release is expected by end of March 2021) for some sort of easy conversion without re-deployment. Ubuntu is also trying to push new users towards their platform but that’s a bigger leap, specially for enterprise or to users that are not familiar with Debian derivatives.

Before doing any of this, please have the following considerations:

  • Convert2RHEL is currently unsupported by Red Hat;
  • Conversion on UEFI systems is not officially supported as there is an open bug on it, but I do address how to prevent (or how to fix) the issue below.
  • This should work on CentOS 6 as well, but this is something I did not test and as it is EOL, I won’t address it here.
  • Having a working backup of the server and that you have the means to restore it. Personally, I use ESXi so I’ll just take an snapshot;
  • Having a valid Red Hat subscriptions. You can obtain a free one thru the developer program here. They offer 16 VM’s which should be sufficient for most of home lab environments.
  • Perform a yum/dnf update to latest version before starting.
For CentOS 8:
# dnf install -y https://github.com/oamg/convert2rhel/releases/download/v0.17/convert2rhel-0.17-1.el8.noarch.rpm

For CentOS 7:
# dnf install -y https://github.com/oamg/convert2rhel/releases/download/v0.17/convert2rhel-0.17-1.el7.noarch.rpm

Initialize conversion:
# convert2rhel --username your_RHSM_account

At this point you’ll be asked to accept the EULA and to confirm a few times about moving forward with the conversion until you’re asked about your RHSM information and you need to select the subscription number which you want to utilize for this (it means the number on top of the subscription information, this is not the pool id!).

Once the conversion finishes, DO NOT REBOOT if you are on a UEFI system, as you’ll likely encounter (at the time of writing) the bug #1898314. (If you got to this article because you got an issue booting after it and landing on grub, don’t worry, I got you.)

If you didn’t reboot, great! You are in time to fix grub and be on your way to boot your system properly.

Step 1: Generate a grub2-mkconfig by doing

# grub2-mkconfig -o /boot/efi/EFI/redhat/grub.cfg


Step 2: Delete the CentOS entry from efibootmgr

# efibootmgr -v


Now we need to delete the entry for CentOS Linux, in this case Boot004. You need to know the boot disk and partition (/boot/efi) for the following steps. (In my case it is on /dev/sda1). Change the release to 7 or 8 depending on what OS you use.

# efibootmgr -Bb 0003
# efibootmgr -c -d /dev/sda -p 1 -l \\EFI\redhat\shimx64.efi -L "Red Hat Enterprise Linux <version>"

At this point you should be having a working environment! Congratulations.

But if you did the same mistake I did… and here we are and rebooted right away after the conversion to find a grub> screen, this is because UEFI conversions are not supported. Basically you have two choices at this point:

  1. Fix it;
  2. Go back to snapshot/backup and re-do it.

If you go for the fix it way, you’ll need a CentOS or Red Hat disk/ISO and go to recovery mode. Once you are chrooted into /sysroot, you can go back to step 1 on how to fix it before rebooting and get it done. Once you’re done, exit the chroot environment and recovery mode and you should be able to login to your Red Hat installation if your upgrade was successful.

Personally I have done few of this upgrades and I haven’t encountered any major issue. Feel free to comment on your own experiences or ask any question below on the comment section.

Good luck!

Reference: redhat.com

Configuring a trunk network without native VLAN on Ubuntu

I had to deal with systemd nonsense today because I’m trying to deploy something cool under Ubuntu. Usually I don’t have to deal with systemd so I thought it may be worth documenting for me to remember.

So, first of all. Doing the first attempt on-the-fly to know networking actually works. In this case I will use vconfig to create the vlan interface, ip for adding the address to the new device and route for the gateway.

For this example I want to use the interface enp9s0f1, the VLAN 205, as IP address I want 10.200.205.22 and my gateway is 10.200.205.254.

# vconfig add enp9s0f1 205
# ip addr add 10.200.205.22/24 dev enp9s0f1.205
# route add default gw 10.200.205.254
# ip link set dev enp9s0f1 up
# ip link set dev enp9s0f1.205 up

Once this is done, you should be able to reach the server thru the network. You might want to setup your DNS too, go to resolved configuration and add the following lines (or modify if already there).

/etc/systemd/resolved.conf

[Resolve]
DNS=8.8.8.8
FallbackDNS=8.8.4.4

Restart systemd-resolved by doing systemctl restart systemd-resolved. Once everything works as it should time to make it persistent.

Go to /etc/systemd/network and you will have to create 3 files. One for the carrier and two for the VLAN interface.

/etc/systemd/network/enp9s0f1.network

[Match]
Name=enp9s0f1

[Network]
VLAN=enp9s0f1.205

Once we specify that we will use a VLAN using enp9s0f1.205 device, we will create enp9s0f1.205.netdev and enp9s0f1.205.network to configure that interface as it should. netdev will specify that it is a VLAN and the ID while the network file will provide the static configuration of the address.

/etc/systemd/network/enp9s0f1.205.netdev

[NetDev]
Name=enp9s0f1.205
Kind=vlan

[VLAN]
Id=205

/etc/systemd/network/enp9s0f1.205.network

[Match]
Name=enp9s0f1.205

[Network]
Description=”VLAN 205″
Address=10.200.205.22/24
Gateway=10.200.205.254

After doing this make sure to have systemd-networkd and systemd-resolved enabled for next boot (systemctl enable …), perform a reboot and everything should be good to go :).

And well this was my first and not pleasant approach to systemd-networkd and systemd-resolved and so far I hated how they work.

If you know a better way to fulfill this, feel free to leave a comment!

Why Windows 8.1 is the best desktop operating system

It’s been 18 months since the release of Windows 8 and 6 months since the release of Windows 8.1. But yet, many people are using outdated operating systems.

Windows XP and Windows 7 still have a big user base. The main reason is because they been told that the Windows 8 interface is not friendly.  Some of those people claim that they used it a little and that they didn’t like it. The main reason is the introduction of the “Start Screen” and the removal of the “Start Menu” that has been used from Windows 95 to Windows 7.

So, what are the reasons to upgrade to Windows 8?

Faster startup: Apparently Microsoft started to realize how important it is to get the desktop running as fast as possible.  It’s the first improvement that you notice when you update. They also added an easier way to disable some applications that run at boot from Task Manager. You can disable a few things to make it even faster. My start-up time currently is 7.8 seconds, which is awesome. The time used by Windows 7 can even be the double.

Starcraft looks as it should. It looked really bad on Windows 7. This also happens with other old applications that used to work fine on Windows XP and didn’t work as they were supposed to since Vista.

taed

Windows App Store, some applications may be so useless but we have to admit that some look neat, like Twitter and Netflix. If you have 2 screens or more you will be in love.

netflix-100010107-orig

PC settings is easier for computer illiterates that have used to have a bad time using Control Panel on older versions.

pc

Touch screens are a nice extra. Although this post is about desktop computers, most of the newest notebooks are shipping with a touch screen and Windows 8.1 support is awesome. Just use a Surface and you will know what I’m talking about.

There are lots of bad things about Windows and sometimes I wish I could be using an *NIX shell or using applications like LinkinusTransmit and Sequel Pro from OS X. But Linux and OS X are far from being usable on some work environments because of the lack of professional applications. (Solidworks and Proteus for example).