Lately I been sorta involved on doing things related to SAP so I thought it would be a great idea to try to setup ABAP at the home lab and test it out.
Full disclosure, I don’t have an actual clue of what’s going on and what I’ll do with this but I thought it was a good idea to try to learn. I’ll do follow up posts to go deeper into it (if I don’t get distracted with something else).
For this specific deployment my environment is the following:
- VMware ESXi 6.7.0
- Red Hat Enterprise Linux 8.3
- SAP NetWeaver AS ABAP Developer Edition 7.52 SP04
- VM sizing it’s 4 vCPU’s and 8GB RAM, 100GB partition for the whole OS.
Step 1: Get your OS deployed and updated.
This part it’s very straight-forward, go to developers.redhat.com and get yourself a free subscription for it. I did a minimal installation on it, subscribed and ran a yum update. (reboot!).
Once it’s deployed, you’ll require rpmfusion non-free (or download unrar from rarlab.com) as this is not providen by Red Hat or EPEL.
yum install libaio tcsh uuid libnsl
Also SAP has a requirement on UUIDD to be able to sort out your license properly, so it’s recommended to install it. However, this package is not available without a valid Red Hat for SAP subscription. You are able to get it from CentOS, I found it on rpmfind.
As this is just for testing, I won’t go too deep into how to setup the filesystems, but base requirements according to the documentation included in the binaries. If you require this on separate partitions, do it in advance.
File system recommendation
/sapmnt ~2GB
/sybase ~50GB
/usr/sap ~3G
My setup
/ 70G
/home 30G
Be sure of having your hostname on /etc/hosts as not having it will have you on a situation where no profile is found. (if this happen, just su to npladm and run startsap ALL manually after fixing it).
Step 2: Configure firewalld
You can skip this if you have firewalld disabled.
By default RHEL8 comes with firewalld using public as the default zone (see your zone executing firewalld --get-default-zone). Modify this while adding the service if you have a different setup.
# firewall-cmd --permanent --new-service=sapnpl
# firewall-cmd --permanent --service=sapnpl --add-port=3200/tcp
# firewall-cmd --reload
# firewall-cmd --permanent --zone=public --add-service=sapnpl
# firewall-cmd --reload
At this point, everything should be setup for you being able to open your SAP instance from SAP Logon on the St
Step 3: Go to developers.sap.com and create an account there for being able to download the trial versions of their products;
Step 4: Download ABAP, the version I’m downloading it’s 11 parts of about 13.5G total. You also need to download the license for it;
Step 5: Upload the SAP install to your VM. For this setup I will use /opt/sapmedia and use unrar to extract all of your files.
Be sure of having your license there as well.
![]()
Remove this files BEFORE running the installer! As it will continue to extract more files and you might run out of space.
Step 6: Run the SAP ABAP installer.
chmod +x install.sh
./install.sh
If all the dependencies were there, it should show you the SAP license agreement and ask you for the OS users that are going to be setup.
It will take a while here, so go grab a snack while that happens. By a while, I mean that you can actually go to the store to get the snack and begin next step once you’re back.
Step 7: Install the SAP Logon (I did install 760) on the client.
Step 8: Configure the system entry on SAP Logon and login.
Fill this up with the application server IP / DNS that your computer can resolve back to your server.

Once that’s done, login using the default passwords which you can find on /opt/sapmedia/index.html (if you extracted the files at /opt/sapmedia)

You can do the same as SAP* or DDIC . Default password for those two accounts is Down1oad.
Step 9: Setup SAP as systemd unit (optional)
By itself, the installer setup sapinit on init.d. However this doesn’t handle the start/stop of your SAP instance.
Some basic commands before we start setting up the systemd unit, so become doing # su - npladm (or login using the master password that was setup during the deployment).
At this point, if you restart the server the application won’t come up by itself, unless you start it manually.
Below the commands for checking the status of your ABAP instance, start and stop.
Using startsap/stopsap (deprecated)
$ startsap ALL
$ startsap check
$ stopsap ALL
Using sapcontrol
$ sapcontrol -nr 0 -function GetProcessList
$ sapcontrol -nr 0 -function StartSystem
$ sapcontrol -nr 0 -function StopSystem
Now we will create few files to make the systemd service, and yeah, there are way better ways to do this with systemd so I hope to hear back from you on the comments! Get as fancy as you can.
/usr/sap/NPL/nplstart.csh
#!/bin/csh
/usr/sap/NPL/SYS/exe/uc/linuxx86_64/sapcontrol -nr 0 -function StartSystem
/usr/sap/NPL/nplstop.csh
#!/bin/csh
/usr/sap/NPL/SYS/exe/uc/linuxx86_64/sapcontrol -nr 0 -function StartSystem
And finally, the service file at /etc/systemd/system/sapnpl.service
[Unit]
Description=sapnpl
After=sapinit.service multi-user.target
Requires=user.slice

[Service]
KillMode=none
Type=oneshot
User=npladm
Group=sapsys
ExecStart="/usr/sap/NPL/nplstart.csh"
ExecStop="/usr/sap/NPL/nplstop.csh"
RemainAfterExit=yes

[Install]
WantedBy=multi-user.target
and let’s make the first 2 files executables and give the ownership to npladm:sapsys
chown npladm:sapsys /usr/sap/NPL/nplstart.csh /usr/sap/NPL/nplstop.csh
chmod +x /usr/sap/NPL/nplstart.csh /usr/sap/NPL/nplstop.csh
Now you should be able to enable/start/stop the service. From this point and on, try not to mess around doing that not using systemd.
Below are the commands to deal with this:
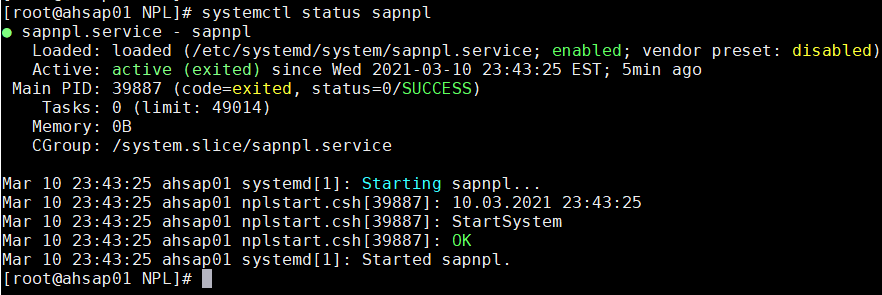
$ systemctl enable --now sapnpl
$ systemctl status sapnpl
$ systemctl start sapnpl
$ systemctl stop sapnpl
The status will look like this
As I mentioned before, not really sure on what I’m trying to achieve or what I’ll do next with it and I’ll try to do a follow up on this soon.