This guide is to give a quick overview on how to setup HiveOS on ESXi 6.7 using PCI passthrough to setup a GPU. This guide assumes that you have an ESXi 6.7 (or higher) setup working. In this case I have the limitation of using vmklinux driver to power up my AMD Ryzen setup, so I cannot upgrade to ESXi 7 without acquiring a new NIC.
Also, this test was done only with a ZOTAC RTX 3070 but all the cards should work exactly the same way. Not sure about PCI passthrough limitations on VMware but in this case it’s only one GPU, so YMMV. I’m using the free version.
This guide is specific to the deployment of HiveOS, however this can be leveraged for other workloads that you might want to virtualize such as Tensorflow. This won’t cover GPU performance tuning, underclocking, etc. as I don’t have the proper experience with HiveOS and mining. No performance should be lost using DirectPath I/O but I’m unsure if this actually true as I didn’t test this device on a non virtualized environment (yet!). However, seems like common consensus about this card is around the same output as the one I’m getting (61.90 MH/s).
Step 1: Download HiveOS
Once you download it the format will be on an .img file and you’ll need to convert it to VMDK. I used Starwind V2V converter for this task.
After converting it I had an issue after I tried to attach it to a VM, so I had to clone the disk inside of ESXi to make it work. (I also tried to upload it from VMware Workstation without success).
For doing this, upload the .vmdk file to your datastore and enable SSH on your ESXi host.
Syntax:
vmkfstools -i /vmfs/volumes/datastore/filename.vmdk /vmfs/volumes/datastore/newfilename.vmdk
Example:
[root@homelab:~] vmkfstools -i /vmfs/volumes/datastore-hdd-1/hiveos1/[email protected] /vmfs/volumes

/datastore-hdd-1/hiveos/hiveos.vmdk
Once this is completed after few minutes depending on your SSD/HDD, the clone will finish and you should be able to assign this drive to a VM HD.
Step 2: Setup your PCI device as passthrough
Make sure that your passthrough status looks as active. If its inactive, click on the upper button “Toggle passthrough”.
This step requires a reboot of the ESXi host.
Step 3: Customize your VM
First, expand memory and check the Reserve all guest memory (all locked) option.
Assign the PCI devices to the VM. Not sure if the sound is required (best guess is not) but I added it anyway.
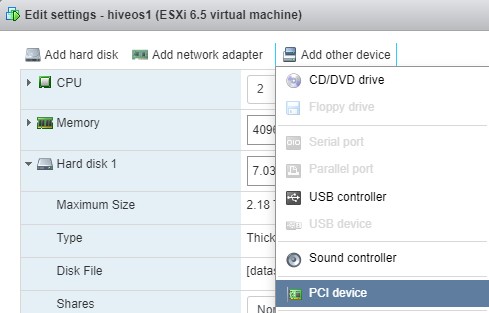
Click on Add other device -> PCI device a couple of times and then assign both devices that come from your NVIDIA GPU.
After this, go to VM options -> Advanced -> Edit configuration and make sure this settings are in place (or set them if not).
svga.guestBackedPrimaryAware = TRUE

svga.present = TRUE

hypervisor.cpuid.v0 = "FALSE"
Please note that if any of this settings is not in place (specially the last one), the VM won’t be able to utilize the CUDA cores as it will complain about “invalid device ordinal”.
Step 4: Setup HiveOS
You should be all set to boot your VM and do a regular HiveOS install. You need to go to HiveOS website and create a worker, you’ll acquire a worker ID and password which you need to setup on your VM.
After that you need to create a “Flight Sheet” if you don’t have one already. Personally I used PhoenixMiner as Ethminer pool wasn’t working at the time I wrote this guide.
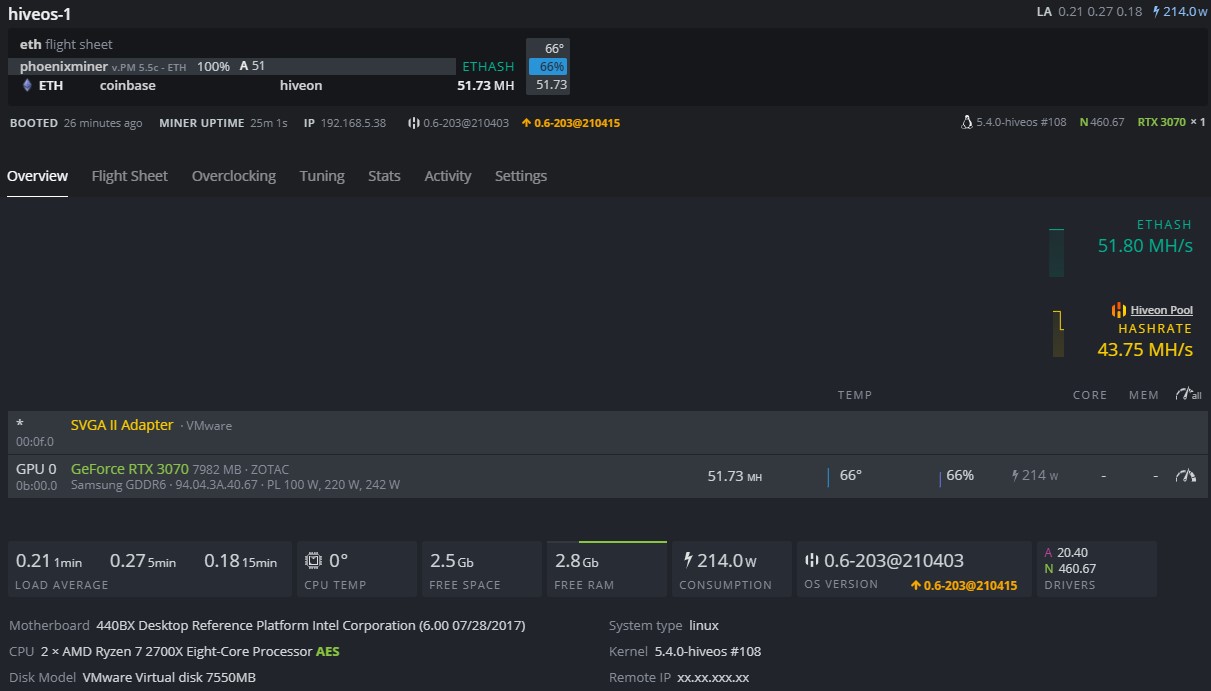
This should be how it looks like after:
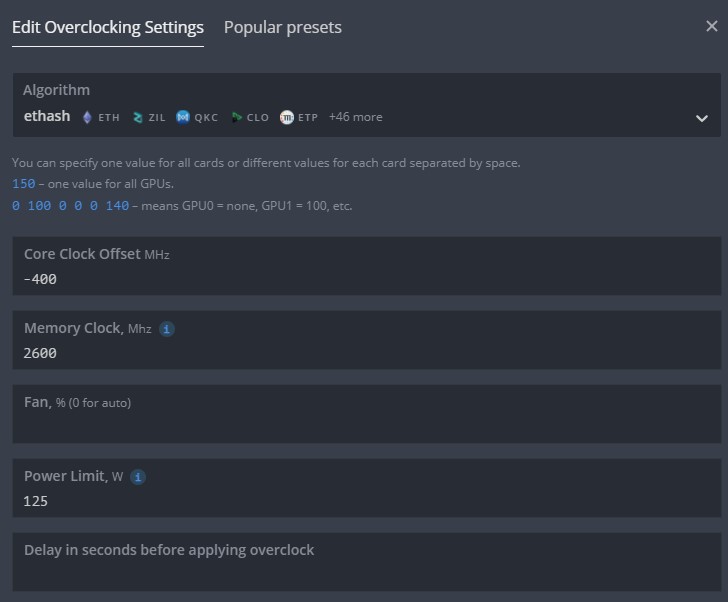
Now you can overclock as you like, without any modification it was doing 51 MH/s (having a 214w consumption) in average, after a little bit of tweaking and trying to be more efficient, I was able to get an average of 61.90 MH/s (125w consumption). But with this YMMV.
As always, feel free to reach out in case you have any question regarding this setup and I’ll try to answer.


Ok, so I just got it working in my hiveos VM but doing the following without hypervisor.cpuid.v0=FALSE, but true for the first boot:
> sudo dpkg -l | grep intel
> sudo apt purge intel-microcode
> sudo update-grub
> sudo shutdown -h 0
Then added the GPU’s as PCIe devices and added back the hypervisor.cpuid.v0=FALSE and it booted.
Thanks for this compile and how to for hiveos
Oh didn’t consider that it would change on Intel (my setup uses a Ryzen), thanks for the input!
Im using AMD Ryzen 7 on a vmware esxi 6.7 since the 7.0 does not detect the latest intel nic card 82576.
I followed the instruction above by creating a new vm with a name hiveos and then uploaded the converted vmdk to datastore1 with a folder name hiveos1. Set the command above vmkfstools. added 2 pci and set vm options.
Unfortunately, during boot up im still getting – No boot file name received. Please advised.
I am using the same card ZOTAC gaming GeForce RTX 3070 but ESXi 7.0.3 with no luck. I am using the same procedure Jayce mentioned as I am using an intel processor but still not able to see the card in the VM. I am having the error drm:nv_drm_load [nvidia_drm] Failed to allocate NvKmsKapiDevice.
Any suggestions?